One of the best ways to stress test your DGX cluster is to use NVIDIA’s HPC benchmarks which can be found in NGC. Since this software is packaged as a container image, we will need to use a container runtime engine such as Singularity to run it. It is worth pointing out that the Linux kernel version should be as recent as possible for HPL to run successfully. The RHEL7 kernel is known not to work.
Preparation
Make sure that the cm-singularity package has been installed in the software image that is being used for your DGX nodes. It is helpful to install it on the head node as well.
It is strongly recommended to switch to a non-root user (e.g. cmsupport which is present on all Bright clusters by default). This also makes it easier to run since the home directory for the root user is not shared across the nodes.
NGC requires authentication, so if you have not obtained an API token already, you can do so here (make sure you are already logged in to the NGC site, or the link will not work).
Download the container image like this:
module load singularity
singularity build --docker-login hpc-benchmarks:20.10-hpl.sif docker://nvcr.io/nvidia/hpc-benchmarks:20.10-hpl
You will be asked for a login and password. The login is $oauthtoken and the password is the API token that was obtained in the previous step.
After running this command you will have a file hpc-benchmarks:20.10-hpl.sif in your home directory.
You can get a bash shell inside of the container by using:singularity run hpc-benchmarks:20.10-hpl.sif
You will want to inspect the contents of the /workspace/hpl-linux-x86_64/ directory where you will find (among other things) a directory called sample-dat that contains sample HPL configuration files.
Launching HPL jobs on a DGX cluster through a workload management system such as Slurm is not as trivial as one would like it to be. For this reason, we will use a helper utility that was created by Alex Volkov of NVIDIA. It can be found obtained from GitHub as follows:
cd ~
git clone https://github.com/Bright-Computing/dgx-hpl
Inside of the ~/dgx-hpl directory you will find a directory containing HPL.dat input files and two job scripts for Slurm:
hpl-singularity-dgx-a100-mN_orte.subhpl-singularity-dgx-a100-mN_pmi.sub
The difference between these two job scripts is the method they use for starting parallel tasks. The first script uses Open Run-Time Environment (ORTE) whereas the second script uses PMI (Process Management Interface).
The ORTE version requires that ssh login to the relevant nodes is allowed, and that all relevant hosts are listed in the ~/.ssh/known_hosts file (which can easily be accomplished by running e.g. pdsh -a uptime).
It is recommended to use the PMI version, unless there is a specific reason for using the ORTE version.
Pre-launch checks
Whether the HPL run is going to be successful and will yield the right performance depends largely on whether the nodes are configured correctly. The following checks can be performed on all nodes to make catch issues before attempting to do an HPL run.
OFED stack
Make sure that you have deployed the Mellanox OFED stack on the software image that was used to deploy the DGX nodes. At the time of writing, the recommended Mellanox OFED stack is version 5.1 (although 5.2 is currently also available).
[root@dgx-01 ~]# ofed_info | head -1
MLNX_OFED_LINUX-5.1-2.5.8.0 (OFED-5.1-2.5.8):
NVIDIA driver
Make sure that you are using the correct version of the NVIDIA driver that is recommended for use on DGX nodes. At the time of writing this is version 450. Newer drivers are not necessarily going to work.
[root@dgx-01 ~]# modinfo nvidia  | grep version | head -1
version:        450.102.04
nv_peer_mem kernel module
Make sure you have installed the nv_peer_mem kernel module
[root@dgx-01 ~]# lsmod | grep nv_peer_mem
nv_peer_mem            16384  0
nvidia              19378176  449 nvidia_uvm,nv_peer_mem,nvidia_modeset
ib_core               425984  9 rdma_cm,ib_ipoib,nv_peer_mem,iw_cm,ib_umad,rdma_ucm,ib_uverbs,mlx5_ib,ib_cm
DCGM and GPU & NVLINK switch discovery
Verify that DCGM detects all GPUs and NVLINK switches:
[root@dgx-01 ~]# dcgmi discovery -l
8 GPUs found.
+--------+----------------------------------------------------------------------+
| GPU ID | Device Information                                                   |
+--------+----------------------------------------------------------------------+
| 0      | Name: A100-SXM4-40GB                                                 |
|        | PCI Bus ID: 00000000:07:00.0                                         |
|        | Device UUID: GPU-550c9100-134d-3b69-492b-37032df00cb3                |
+--------+----------------------------------------------------------------------+
| 1      | Name: A100-SXM4-40GB                                                 |
|        | PCI Bus ID: 00000000:0F:00.0                                         |
|        | Device UUID: GPU-a0f60173-b4ac-6f54-8498-c282e6e623e0                |
+--------+----------------------------------------------------------------------+
| 2      | Name: A100-SXM4-40GB                                                 |
|        | PCI Bus ID: 00000000:47:00.0                                         |
|        | Device UUID: GPU-5491fbcc-c99d-7b7c-bd65-4d1649829101                |
+--------+----------------------------------------------------------------------+
| 3      | Name: A100-SXM4-40GB                                                 |
|        | PCI Bus ID: 00000000:4E:00.0                                         |
|        | Device UUID: GPU-da3f8b45-1c35-5d0f-052c-ed4ad5c21b03                |
+--------+----------------------------------------------------------------------+
| 4      | Name: A100-SXM4-40GB                                                 |
|        | PCI Bus ID: 00000000:87:00.0                                         |
|        | Device UUID: GPU-566c30f1-5446-4a8e-f30d-8a52c9f1ff5a                |
+--------+----------------------------------------------------------------------+
| 5      | Name: A100-SXM4-40GB                                                 |
|        | PCI Bus ID: 00000000:90:00.0                                         |
|        | Device UUID: GPU-6223332f-4ff2-2967-6e49-99c476f8e6f7                |
+--------+----------------------------------------------------------------------+
| 6      | Name: A100-SXM4-40GB                                                 |
|        | PCI Bus ID: 00000000:B7:00.0                                         |
|        | Device UUID: GPU-52e40f96-805e-a20c-1af3-85f81fb1cbca                |
+--------+----------------------------------------------------------------------+
| 7      | Name: A100-SXM4-40GB                                                 |
|        | PCI Bus ID: 00000000:BD:00.0                                         |
|        | Device UUID: GPU-a1d2ac06-4c2d-3004-b778-de9d5250d6ad                |
+--------+----------------------------------------------------------------------+
6 NvSwitches found.
+-----------+
| Switch ID |
+-----------+
| 10        |
| 11        |
| 12        |
| 8         |
| 13        |
| 9         |
+-----------+
MTU
Make sure that you are using the IB interfaces in connected mode with a high MTU (e.g. 65520).
[root@dgx-01 ~]# cat /sys/class/net/ib*/mtu | uniq
65520
[root@dgx-01 ~]# cat /sys/class/net/ib*/mode | uniq
connected
If the MTU that you configured for your IB network in Bright is not set, doing the following often helps:
echo "options ib_ipoib ipoib_enhanced=0" >> /cm/images/dgx-a100-image/etc/modprobe.d/ib_ipoib.confIB port status
Verify that all your IB interfaces are up:
[root@dgx-01 ~]# ibstat | grep State | grep -v Active
[root@dgx-01 ~]#
IB kernel modules
Verify that all relevant IB related kernel modules were loaded properly by verifying the status of the openibd service (which is responsible for loading the modules).
[root@dgx-01 ~]# systemctl status openibd.service
● openibd.service - openibd - configure Mellanox devices
   Loaded: loaded (/usr/lib/systemd/system/openibd.service; enabled; vendor preset: disabled)
   Active: active (exited) since Wed 2021-03-03 11:20:09 EST; 51min ago
     Docs: file:/etc/infiniband/openib.conf
 Main PID: 89146 (code=exited, status=0/SUCCESS)
    Tasks: 0
   Memory: 360.0K
   CGroup: /system.slice/openibd.service

Mar 03 11:20:08 dgx-01 systemd[1]: Starting openibd - configure Mellanox devices...
Mar 03 11:20:09 dgx-01 openibd[89146]: Loading HCA driver and Access Layer:[  OK  ]
Mar 03 11:20:09 dgx-01 systemd[1]: Started openibd - configure Mellanox devices.
It has been observed that nvidia modules (specifically the nvidia_uvm module) sometimes claim the Infiniband major device number (231). If this happens, it can be worked around by loading the ib_umad module at a very early stage:
echo ib_umad > /cm/images/dgxa100-image/etc/modules-load.d/ib_umad.confDetermining UCX affinity
It is good to be aware of the affinity between RDMA interfaces and GPUs. This can be shown by using nvidia-smi topo -m:
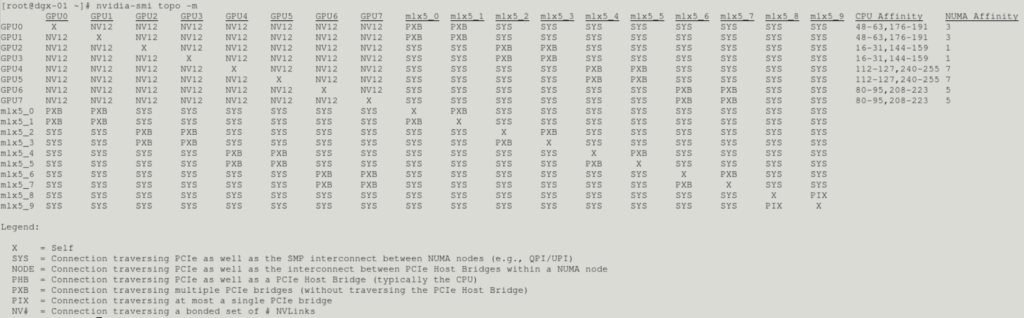
In order to obtain optimal performance, it is important to set the correct UCX_AFFINITY. The following table will be helpful in determining the appropriate UCX_AFFINITY value.

When the optional port 5 is used, the recommended UCX_AFFINITY is:
UCX_AFFINITY="mlx5_0:mlx5_1:mlx5_2:mlx5_3:mlx5_6:mlx5_7:mlx5_8:mlx5_9" Without port 5 the recommended UCX_AFFINITY is:
UCX_AFFINITY="mlx5_0:mlx5_1:mlx5_2:mlx5_3:mlx5_4:mlx5_5:mlx5_6:mlx5_7" Performing a run
To start an HPL run on the cluster, either one of the job scripts mentioned earlier needs to be submitted to the Slurm workload management system. This can be done using sbatch. Several parameters can be passed, which can be listed by calling the job script with –help:
[cmsupport@utilitynode-01 dgx-hpl]$ sh hpl-singularity-dgx-a100-mN_pmi.sub --help
Description
===========
Orchestrates HPL runs via PMI using "nvcr.io/nvidia/hpc-benchmarks:20.10-hpl"
container converted to singularity. This singularity container path is set to:
    ${HOME}/singularity_images/hpc-benchmarks_20.10-hpl.sif
Override the path to the container via --container option.

This script is hard-coded for the HPL runs to be done on DGX-A100. The basedir
is set to:
    ${HOME}/projects/hpl_tests
Override the basedir via --basedir option.

The basedir is only used to lookup the path to the hpldatfiles directory.
    ${_basedir}/hpldatfiles
If an explicit path is set to hpldatdir via option --hpldatdir then basedir is
not used for anything.

The following non-standard parameters are set in the script to override
defaults within containers hpl.sh script:
    UCX_AFFINITY="mlx5_0:mlx5_1:mlx5_2:mlx5_3:mlx5_4:mlx5_5:mlx5_6:mlx5_7"
The above is for DGX-A100 with Slot 5 NOT populated. When Slot 5 is populated
these should be set to:
    UCX_AFFINITY="mlx5_0:mlx5_1:mlx5_2:mlx5_3:mlx5_6:mlx5_7:mlx5_8:mlx5_9"

The multinode orchestration is done by PMI (Process Management Interface).
Specifically the PMI-2 is set via option to srun (srun --mpi=pmi2). Refer to:
https://openpmix.github.io/support/faq/how-does-pmix-work-with-containers

HPL typically runs on sets of nodes of power of 2 i.e. 1, 2, 4, 8, 16, ...
The HPL dat files are parameters for HPL. These need to be placed at:
    ${_basedir}/hpldatfiles
Override the path to the HPL dat files via --hpldatdir

Four files are provided:
    HPL.dat_4x2_dgxa100_40G, HPL.dat_4x4_dgxa100_40G, HPL.dat_8x4_dgxa100_40G, HPL.dat_8x8_dgxa100_40G
Corresponding to 1, 2, 4 or 8 node runs. The files are automatically set in this
script based on the number of nodes allocated.

Usage Examples
==============
This script cannot be run via srun directly. Run it via sbatch. To run
interactively first salloc then just run the script. When run via sbatch the
results will be written to file:
    slurm-test-hpl.<JOBID>.<First-Node-Name>.out
For interactive runs the results will be printed to stdout.

Single node
-----------
Default SBATCH parameters in the script are:
#SBATCH -N 1
#SBATCH --time=20:00
#SBATCH --ntasks-per-node=8
#SBATCH --job-name "test-hpl"
#SBATCH --output=slurm-%x.%J.%N.out

Submit via sbatch for default 1 node run.
$ sbatch hpl-singularity-dgx-a100-mN_pmi.sub

To run interactively via salloc requires specifying Slurm options at command line:
$ salloc -N 1 --ntasks-per-node=8
$ ./hpl-singularity-dgx-a100-mN_pmi.sub
$ exit # exit salloc session

The --ntasks-per-node option needs to match number of GPUs per node. On
DGX-A100 this is 8 GPUs.

Multinode
---------
The multinode runs are done by varying -N|--nodes=<minnodes[-maxnodes]> with
the Slurm sbatch or salloc submissions.

Example two node run:
$ sbatch -N 2 --ntasks-per-node=8 hpl-singularity-dgx-a100-mN_pmi.sub

Example with node selection. Running on dgx-05 to dgx-08:
$ sbatch --nodelist=dgx-[05-08] -N 4 --ntasks-per-node=8 hpl-singularity-dgx-a100-mN_pmi.sub

Options
=======
hpl-singularity-dgx-a100-mN_pmi.sub [options]

    -h|--help
        * Prints description and options.

    --basedir <Base directory>
        * Default: ${HOME}/projects/hpl_tests

    --container <Path to the singularity container>
        * Override default container path:
            ${HOME}/singularity_images/hpc-benchmarks_20.10-hpl.sif

          Getting the container:
            export SINGULARITY_DOCKER_USERNAME=''
            export SINGULARITY_DOCKER_PASSWORD=<NVIDIA NGC API key>
            singularity pull docker://nvcr.io/nvidia/hpc-benchmarks:20.10-hpl

    --hpldatdir <Path to the directory with HPL dat files>
        * Default: ${_basedir}/hpldatfiles

Example with options:
$ sbatch -N 2 --ntasks-per-node=8 hpl-singularity-dgx-a100-mN_pmi.sub --hpldatdir ${HOME}/hpldatfiles
It is important to make sure that the UCX_AFFINITY value in the job script, is updated with the UCX_AFFINITY value that was obtained in the previous section.
It is a good idea to first try a run on a single node before trying to do a run on multiple nodes or the entire cluster. This can be done as follows:
sbatch -N 1 --ntasks-per-node=8 hpl-singularity-dgx-a100-mN_pmi.sub --container ~/hpc-benchmarks:20.10-hpl.sif --basedir ~/dgx-hplOutput can be found in ~/dgx-hpl/slurm-test-hpl.X.Y.out (where X is the job id and Y is the hostname of the node).
To perform an 8 node run:
sbatch -N 8 --ntasks-per-node=8 hpl-singularity-dgx-a100-mN_pmi.sub --container ~/hpc-benchmarks:20.10-hpl.sif --basedir ~/dgx-hplExample output for an 8 node (DGX A100) run:
================================================================================

T/V                N    NB     P     Q               Time                 Gflops

--------------------------------------------------------------------------------

WR01L8R2      571392   288     8     8             169.61              7.333e+05

--------------------------------------------------------------------------------

||Ax-b||_oo/(eps*(||A||_oo*||x||_oo+||b||_oo)*N)=        0.0000044 ...... PASSED

================================================================================


Finished      1 tests with the following results:

              1 tests completed and passed residual checks,

              0 tests completed and failed residual checks,

              0 tests skipped because of illegal input values.

--------------------------------------------------------------------------------


End of Tests.

================================================================================
The result above show 733.3 TFlop/s on an 8 node DGX A100 system, which matches what one may expect of such a system.