These instructions are not relevant for installations of Bright Cluster Manager 9.1 and newer. An integration with enroot and pyxis has been introduced in Bright Cluster Manager 9.2 and later back-ported to Bright Cluster Manager 9.1. Additionally, Jupyter kernels for enroot and pyxis have been included in Bright Cluster Manager 9.2. Please refer to the Administration manual for appropriate instructions.
If you are running Bright Cluster Manager 9.1, with updated versions of Bright packages it is possible to install enroot and pyxis via cm-wlm-setup for new Slurm deployments. Alternatively, it is also possible to add enroot and pyxis to an existing Slurm deployments by running for example:
yum install git -y
module load slurm
/cm/shared/apps/slurm/var/cm/install-pyxis.sh -d /cm/shared/apps/slurm/current/lib64
This article will explain the steps that are needed to install NVIDIA’s enroot tool on a Bright cluster. Enroot allows container images to be executed without a container runtime engine such as Docker. In addition we will show how the pyxis Slurm plugin can be deployed so that enroot can be used from within Slurm jobs. We will then show how an arbitrary Docker image can be extended with the Jupyter Enterprise Gateway endpoint that will allow the container image to be used in JupyterLab setups that are commonly found on Bright clusters. Lastly, we show how a Jupyter kernel template can be set up that can be instantiated by users to create a kernel that when selected from the Jupyter launcher, will run the desired Docker image through Slurm (leveraging pyxis and enroot), allowing the user to access the running container through a Jupyter notebook.
Configure user namespaces.
The kernel parameters on head node(s) and compute nodes need to be changed in order
to support user spaces.
- The operating system should support user-owned namespaces:
namespace.unpriv_enable=1anduser_namespace.enable=1 - Also, two sysctl options:
user.max_mnt_namespacesanduser.max_user_namespaces
describe the number of namespaces that are available to users.
IMAGE_NAME=default-image
sed -i -e 's/\(GRUB_CMDLINE_LINUX=\)\(.*\)"/\1\2 namespace.unpriv_enable=1 user_namespace.enable=1"/' /etc/default/grub
cmsh -c "softwareimage; use ${IMAGE_NAME}; append kernelparameters namespace.unpriv_enable=1 user_namespace.enable=1; commit"
echo -e "user.max_mnt_namespaces = 32" > /etc/sysctl.d/10-enroot.conf
echo -e "user.max_user_namespaces = 32" >> /etc/sysctl.d/10-enroot.conf
cp /etc/sysctl.d/10-enroot.conf /cm/images/${IMAGE_NAME}/etc/sysctl.d/10-enroot.conf
cmsh -c "device; reboot -m ${IMAGE_NAME}"
The head node(s) also need(s) to be rebooted.
Download and install Enroot
The latest releases of enroot is available here (https://github.com/NVIDIA/enroot/releases)
IMAGE_NAME=default-image
wget https://github.com/NVIDIA/enroot/releases/download/v3.4.0/enroot-3.4.0-2.el7.x86_64.rpm
wget https://github.com/NVIDIA/enroot/releases/download/v3.4.0/enroot+caps-3.4.0-2.el7.x86_64.rpm
yum install -y ./enroot-3.4.0-2.el7.x86_64.rpm ./enroot+caps-3.4.0-2.el7.x86_64.rpm
yum install -y --installroot=/cm/images/${IMAGE_NAME} ./enroot-3.4.0-2.el7.x86_64.rpm ./enroot+caps-3.4.0-2.el7.x86_64.rpm
echo 'ENROOT_RUNTIME_PATH        ${HOME}/enroot' >> /etc/enroot/enroot.conf
cp -f /etc/enroot/enroot.conf /cm/images/${IMAGE_NAME}/etc/enroot/
cmsh -c "device; imageupdate -m ${IMAGE_NAME} -w"
Check that enroot is working
Commands should work both with privileged and with unprivileged users.
enroot import docker://gcr.io#google-containers/debian-base:v2.0.0
enroot create google-containers+debian-base+v2.0.0.sqsh
enroot start google-containers+debian-base+v2.0.0 cat /etc/os-release
Download, build and install pyxis
Slurm should be installed to build pyxis.
The latest pyxis releases are available here (https://github.com/NVIDIA/pyxis/releases)
IMAGE_NAME=default-image
git clone https://github.com/NVIDIA/pyxis.git
pushd pyxis
git checkout fce2847
module load slurm
make rpm
yum install -y ./nvslurm-plugin-pyxis-0.9.1-1.*.x86_64.rpm
yum install -y --installroot=/cm/images/${IMAGE_NAME} ./nvslurm-plugin-pyxis-0.9.1-1.*.x86_64.rpm
popd
cmsh -c "device; imageupdate -m ${IMAGE_NAME} -w"
Slurm now needs to be made aware about the new SPANK module provided by pyxis:
module load slurm
mkdir $(dirname ${SLURM_CONF})/plugstack.conf.d
echo "include $(dirname ${SLURM_CONF})/plugstack.conf.d/*" >> $(dirname ${SLURM_CONF})/plugstack.conf
echo "required /usr/lib64/slurm/spank_pyxis.so remap_root=1 execute_entrypoint=0" \
        > $(dirname ${SLURM_CONF})/plugstack.conf.d/pyxis.conf
By default, pyxis stores unpacked images under /run, which is mapped to memory. If the nodes do not have enough RAM, then the storage path can be pointed to /tmp instead:
echo "required /usr/lib64/slurm/spank_pyxis.so runtime_path=/tmp remap_root=1 execute_entrypoint=0" \
    > $(dirname ${SLURM_CONF})/plugstack.conf.d/pyxis.conf
Running a Jupyter kernel
– Prerequisites.
In order to build a custom image for a Jupyter kernel we will be using docker and a local docker registry. They can be installed with cm-docker-setup and cm-container-registry-setup. Also enroot has to be configured to allow use of the local registry.
IMAGE_NAME=default-image
mkdir -p /cm/images/${IMAGE_NAME}/etc/docker/certs.d
echo "SSL_CERT_DIR    /etc/docker/certs.d/master:5000" >> /etc/enroot/enroot.conf
\cp -f /etc/enroot/enroot.conf /cm/images/${IMAGE_NAME}/etc/enroot/
cmsh -c "device; imageupdate -m ${IMAGE_NAME} -w"
Please note that in this example the hostname of the registry node is master (which on a Bright cluster always leads to the active head node).
– Customize docker image.
In this setup only Python kernels are supported. In this example the official Jupyter image is being used. Feel free to try other images in the FROM section. For example, from the NGC registry.
mkdir jupyter-docker-image
pushd jupyter-docker-image
echo "FROM jupyter/datascience-notebook" > Dockerfile
echo "RUN pip install cm-jupyter-eg-kernel-wlm==2.0.0" >> Dockerfile
docker build --network=host -t master:5000/local/datascience-notebook .
docker push master:5000/local/datascience-notebook:latest
popd
To check if the image can be used in enroot+pyxis.
srun --container-image master:5000#local/datascience-notebook:latest cat /etc/os-releaseIt might take up to 20 minutes to download and unpack the image. To reduce the cached image data it is possible to give an image a name.
    srun --container-image master:5000#local/datascience-notebook:latest \
        --container-name=master:5000#local_datascience-notebook:latest \
        cat /etc/os-release
In this case the unpacked image will be stored under ~/.local/share/enroot/ and the user should carry out a manual cleanup to save space.
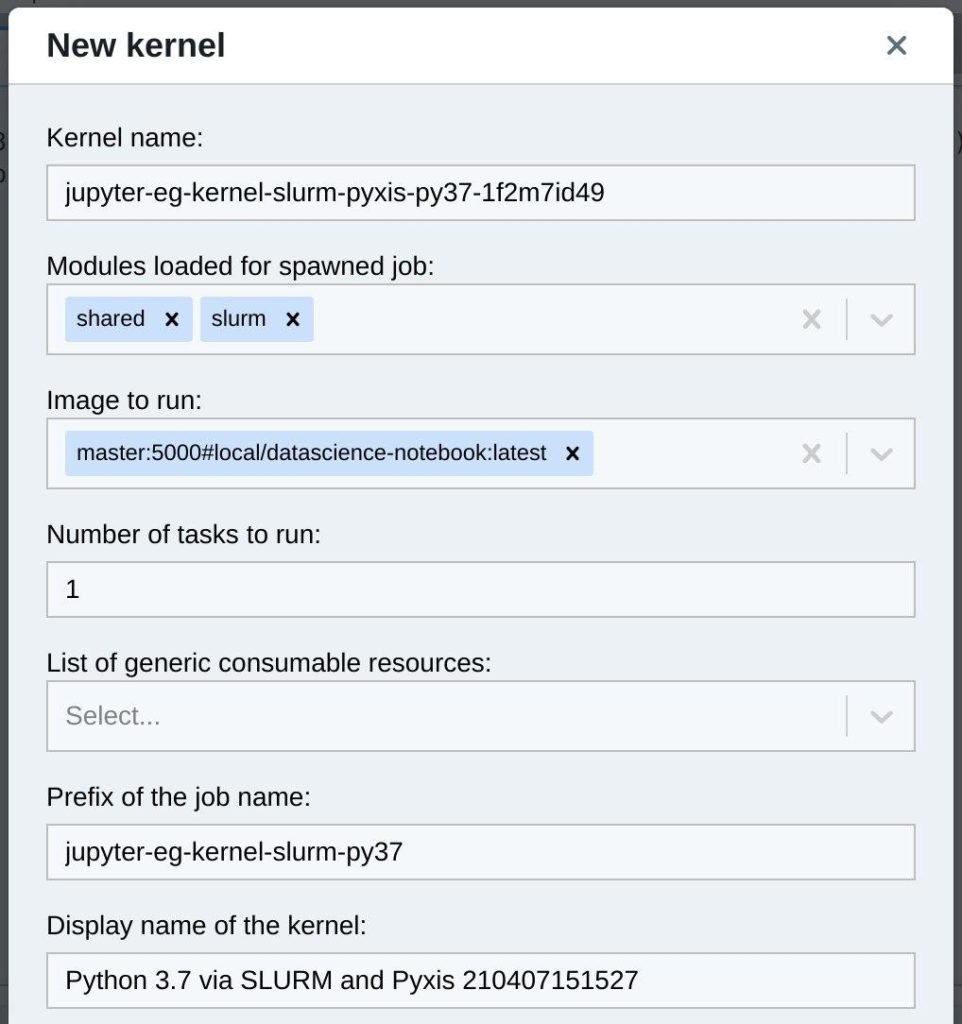
– Setting up Jupyter Kernel templates
A sample kernel template is available here (https://support.brightcomputing.com/kb-articles/enroot-pyxis/jupyter-eg-kernel-slurm-pyxis-py37.tar.gz).
It slightly diverges from a standard Jupyter kernel template. Another parameter is added in meta.yaml to allow the user to choose an image to load and run. Also batch job templates are changed accordingly in kernel.json.j2 to use Pyxis.
wget https://support.brightcomputing.com/kb-articles/enroot-pyxis/jupyter-eg-kernel-slurm-pyxis-py37.tar.gz
tar -xzf jupyter-eg-kernel-slurm-pyxis-py37.tar.gz
cp -pr jupyter-eg-kernel-slurm-pyxis-py37 /cm/shared/apps/jupyter/current/lib/python3.7/site-packages/cm_jupyter_kernel_creator/kerneltemplates/
On a first run the kernel installation could timeout because downloading and unpacking image takes up to 30 minutes.
These commands worked for the root user, but not for a unprivileged user:
$ enroot import docker://gcr.io#google-containers/debian-base:v2.0.0
mkdir: cannot create directory ‘/run/enroot’: Permission denied
mkdir: cannot create directory ‘/var/lib/enroot’: Permission denied
mkdir: cannot create directory ‘/run/enroot’: Permission denied