This article is being updated. Please be aware the content herein, not limited to version numbers and slight syntax changes, may not match the output from the most recent versions of Bright. This notation will be removed when the content has been updated.
How to install Bright under KVM
In this post we are going to explore the installation of Bright Cluster Manager on top of the KVM hypervisor.
There are many ways to create virtual machines on KVM. We will use libvirt methods. These methods can be run from the command line with the utility “virsh”, and can be run from a GUI using the gui application “virt-manager”.
The libvirt, qemu and KVM version tested are:
libvirt 1.2.15
QEMU 2.3.0
KVM – GNU/Linux kernel 4.1.6
We will use the “default” network created by libvirt after the installation. This uses the bridge “virbr0”, and will represent the public network used to access the cluster through the head node.
Also we will create another network that will be used as internal network for the management of the cluster and the communication with the compute nodes.
This FAQ has two main sections:
Command line instructions
GUI instructions
Command line instructions
The internal network is created as follows:# cat > /tmp/cluster1_intnet << __EOF__<network> <name>cluster1_intnet</name> <bridge name='cluster1_intnet' stp='on' delay='0'/></network>__EOF__# virsh net-define /tmp/cluster1_intnet# virsh net-start cluster1_intnet# virsh net-autostart cluster1_intnet
The cluster name is assumed to be cluster1. It should be changed appropriately for the actual case.
The head node can be created as follows:# virt-install -n cluster1 \ --memory 4096 \ --cdrom /home/shared/software/os/bright/bright7.1-centos7u1.iso \ --boot cdrom,hd \ --disk size=30,path=/dev/vg_system/cluster1,bus=virtio \ -w bridge=cluster1_intnet,model=virtio \ -w bridge=virbr0,model=virtio \ --arch=x86_64 \ --memballoon model=virtio \ --graphics spice
The path to the Bright ISO used, and the network name used, as well as the cluster name, should be set appropriately.
Install Bright Cluster Manager on the Head Node (see http://support.brightcomputing.com/manuals/7.1/installation-manual.pdf).
After the head node installation is done, a compute node can be installed with:# virt-install -n cluster1_node001 \ --memory 2048 \ --pxe \ --disk size=30,path=/dev/vg_system/cluster1_node001,bus=virtio \ -w bridge=cluster1_intnet,model=virtio \ --arch=x86_64 \ --memballoon model=virtio \ --graphics spice
Here to the node name, disk path, and network name should be set appropriately.
This step can be repeated to add as many compute nodes as are needed.
GUI instructions
In this case the “virt-manager” graphical tool is used to create a private network, and to install the head node and the compute nodes.
The application can be run from the command line:# virt-manager
or can be run using the KVM icon in the desktop window manager.
The following screenshot shows the GUI display. It shows the cluster that was created earlier using the command line:

In order to create a new cluster a new isolated private internal network must be created. This can be done as follows: click on “Edit -> Connection Details”, select the “Virtual Networks” tab.
In this example cluster2 is assumed to be the cluster name. It should be changed appropriately for the actual case:

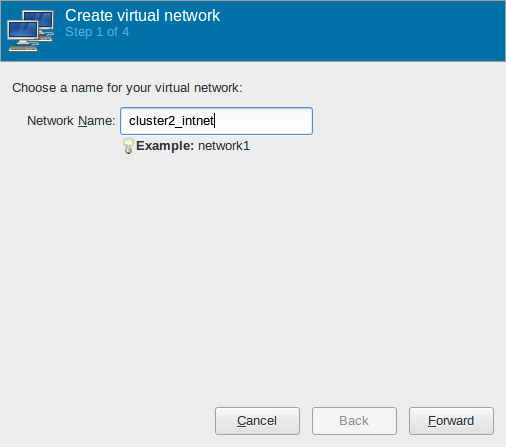
Click on the “+” button on the left corner to add a new network. Insert the network name — in this example “cluster2_intnet” — and press the “forward” button:
Uncheck the checkbox “Enable IPv4 network adddress space definition” and press the “forward” button, this because we let the head node take care of network management:

Similarly, uncheck the checkbox for “Enable IPv6 network address space definition”:

Enable the radio button “Isolated Network”, blank the “DNS Domain Name”, and click the “Finish” button. It is now possible to clone the “Connection Details” windows:

The network is now ready to be used.
Create the head node clicking on “File -> New Virtual Machine”.
Select “Local install media (ISO image or CDROM)” and press the “Forward” button:

Select the Bright Cluster Manager ISO using the “Browse” button and click the “Forward” button:

Select the amount of RAM for the Head Node, it is advisable to use 4096MB and select the number of CPU according to the number of CPU/Core present on the system:

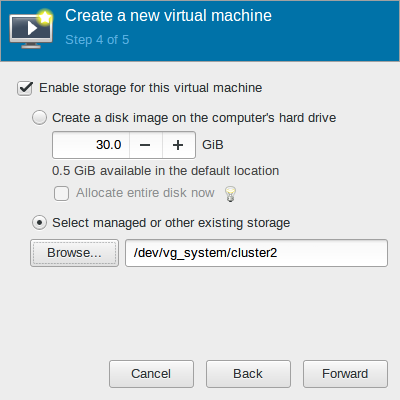
Specify the size of the Hard Disk. A head node needs at least 30GB:

Selecting the first option “Create a disk image on the computer’s hard drive” creates an image in “/root/VitualMachines/cluster2.qcow2” by default. Otherwise it is possible to select the second option “Select managed or other existing storage” and click to the button “Browse” to select a new storage device and create a volume for the virtual machine.
In this example, a new Logical Volume, “cluster2” is created in the volume group “vg_system”. Click the “Forward” button.
Select the checkbox “Customize configuration before install” and select the new created network, in this case “Virtual network cluster2_intnet”. Assign a name to the virtual machine, in this case “cluster2” and click the “Finish” button:

Now we are going to customize the new virtual machine by adding a secondary network card to expose the head node to the internet.
Click on the “Add hardware” button:
Now in order to add a network card select the “Network”, choose a suitable network connected to internet. In our example we use the default in NAT mode, and select virtio as the driver. Click the “Finish” button:

Now select the interface connected to the “cluster2_intnet” and change the “Device model” to “virtio”:

Select “Video default” and change the model to “QXL”.
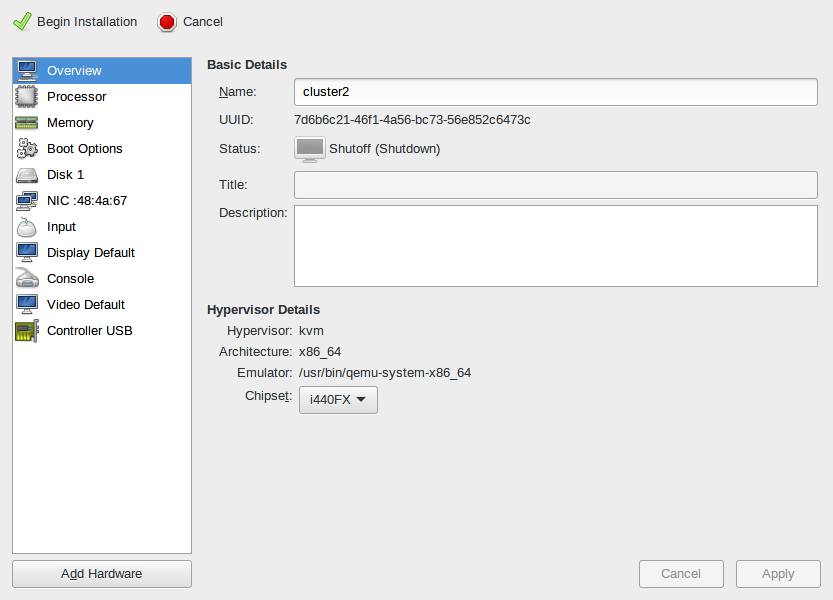
Select “Disk 1” and change in the “Advanced options” the “Disk bus” type to “VirtIO”:

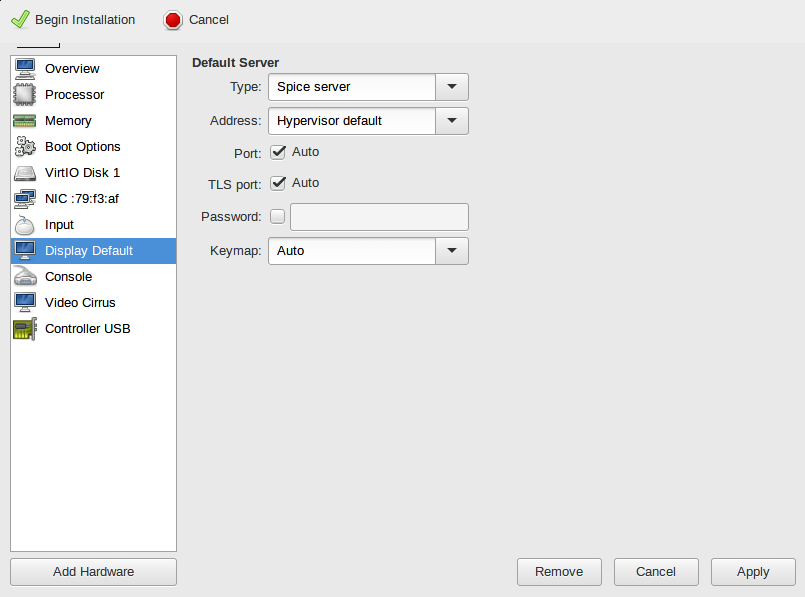
Select the “Display Default” and set the “Type” to “Spice Server”.
Click on “Begin installation” and install the head node. (see http://support.brightcomputing.com/manuals/7.1/installation-manual.pdf)
N.B. If after pressing the “Begin installation” button the graphical console doesn’t show anything, close the windows and reopen it, clicking two times on the virtual machine icon.
Now create the first compute node.
Click on “File -> New Virtual Machine” and select “Network Boot (PXE)”, then press the “Forward” button.
Select the type of Operating System and click the “Forward” button:

Choose the amount of RAM and the number of CPU/Core and click the “Forward” button:

Create a new disk for the compute node, by repeating the steps described earlier when creating the head node. Depending on the setup, it is possible to create a new disk file or to use an existing pool.
In this example we create the volume “cluster2_node001” using the existing pool “vg_system” like we did for the head node.
Click on the “Forward” button:


Assign a name to the virtual machine, in this example “cluster2_node001”, enable the checkbox “Customize configuration before install” and select the network created before, in this case “cluster2_intnet”. Click on the “Finish” button:

Select “Disk 1” and in “Advanced options” change the “Disk bus” in “VirtIO”:
Select the “NIC…” and set the “Device model” to “virtio:
Select “Video Default” and select the “Model” in “QXL”.
Select the “Display Default” and select the “Type” in “Spice Server”:

Click on “Begin installation” and install the first compute node (http://support.brightcomputing.com/manuals/7.1/installation-manual.pdf)
N.B. If after the press of the “Begin installation” button the graphical console doesn’t show anything, close the windows and reopen it clicking two times on the virtual machine icon.
Repeat this step for as many nodes as needed.