Purpose
Bright’s Jupyter integration provides a rich set of features that offer a point-and-click interface to the underlying compute cluster. One of them is the Jupyter Kernel Creator. It allows users to create kernels that run on the cluster through an HPC workload scheduler or Kubernetes. However, some organizations want to prepopulate the launcher with kernel definitions that any user can use without customizing a template. This article explains how to accomplish this.
Example
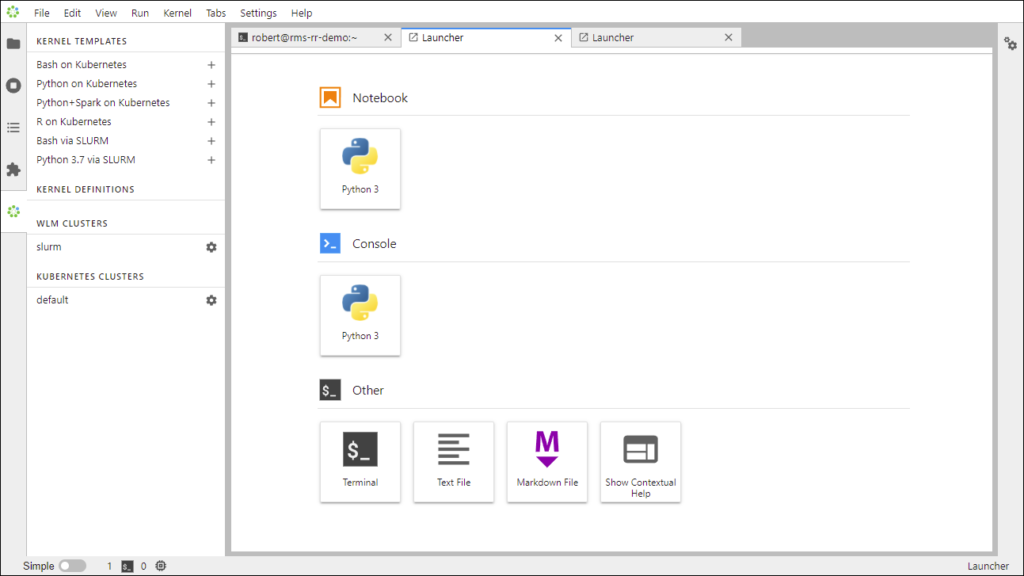
This is what the Jupyter launcher looks like after deploying Jupyter on a Bright cluster. We aim to create a kernel that runs a notebook on the HPC cluster via the Slurm scheduler and make that kernel available for use in every user’s launcher, just like the Python 3 kernel shown below.
Steps
1. Log in to the cluster head node as the root user.
2. Load the Jupyter Linux environment module.
[root@rms-rr-demo ~]# module load jupyter
Loading jupyter/12.1.0
Loading requirement: python37
3. Now that you have loaded the Jupyter module, you can use the jupyter command. This will allow you to see what kernels will be displayed in the launcher for the command user.
[root@rms-rr-demo ~]# jupyter kernelspec list
Available kernels:python3 /cm/shared/apps/jupyter/12.1.0/share/jupyter/kernels/python3
4. Find out what directories Jupyter searches for kernel definitions.
- Jupyter looks for kernels in the “data” directories below. As you see, the Python3 kernel is in
/cm/shared/apps/jupyter/12.1.0/share/jupyter, which is one of the directories Jupyter searches. - In this example, we’re running the
jupytercommand as the root user; therefore, kernels would be in/root/.local/share/jupyter. - However, the
jupytercommand is really looking in$HOME/.local/share/jupyter,$HOMEjust happens to be/rootin this case:
[root@rms-rr-demo ~]# jupyter --paths
config:
/root/.jupyter/cm/local/apps/python37/etc/jupyter
/cm/shared/apps/jupyter/12.1.0/etc/jupyter
/etc/jupyter
data:
/root/.local/share/jupyter
/cm/local/apps/python37/share/jupyter
/cm/shared/apps/jupyter/12.1.0/share/jupyter
/usr/share/jupyter
runtime:
/root/.local/share/jupyter/runtime
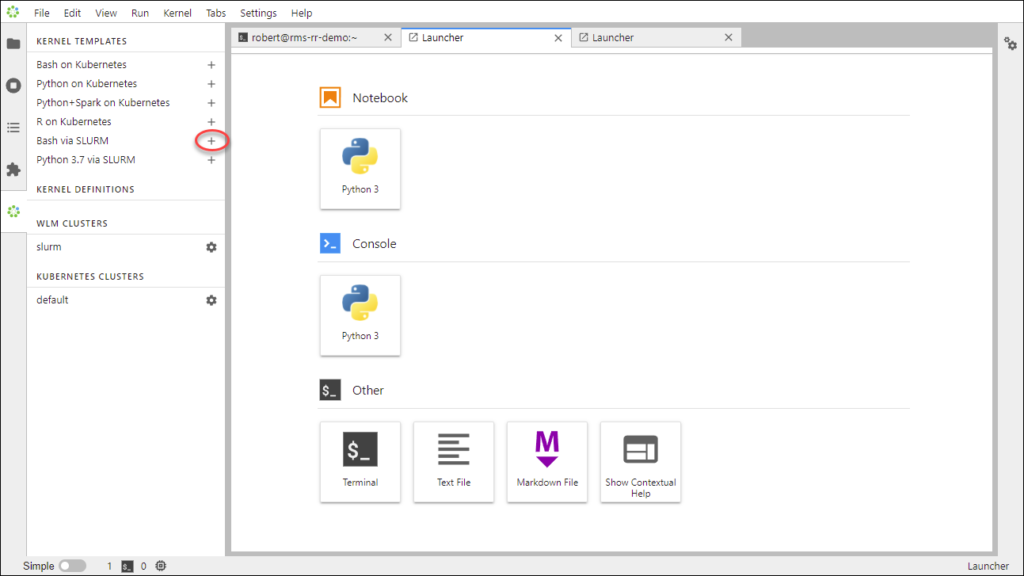
5. Create a kernel definition that runs a notebook on the HPC cluster via Slurm scheduler
- Although we’re running the above
jupytercommands as the root user in the shell, we’re logged into Jupyter as the userrobert; so we’ll create a kernel as that user - To create the kernel, click the “plus” sign to the right of the “Bash via Slurm” template label.
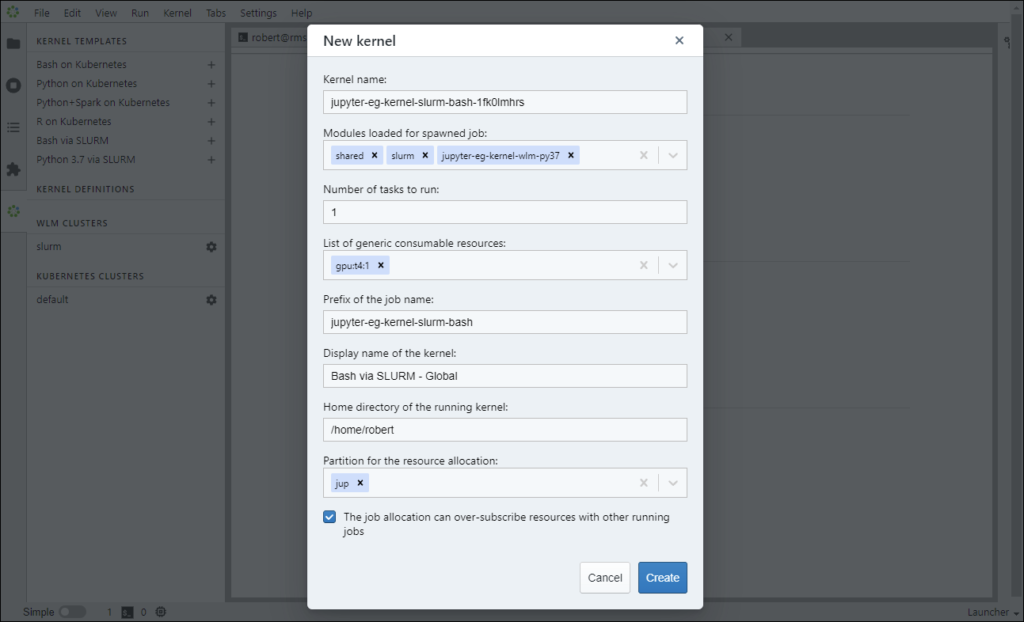
- Next, we customize the template to create the kernel.
- This is what the kernel template looks like before making any changes:
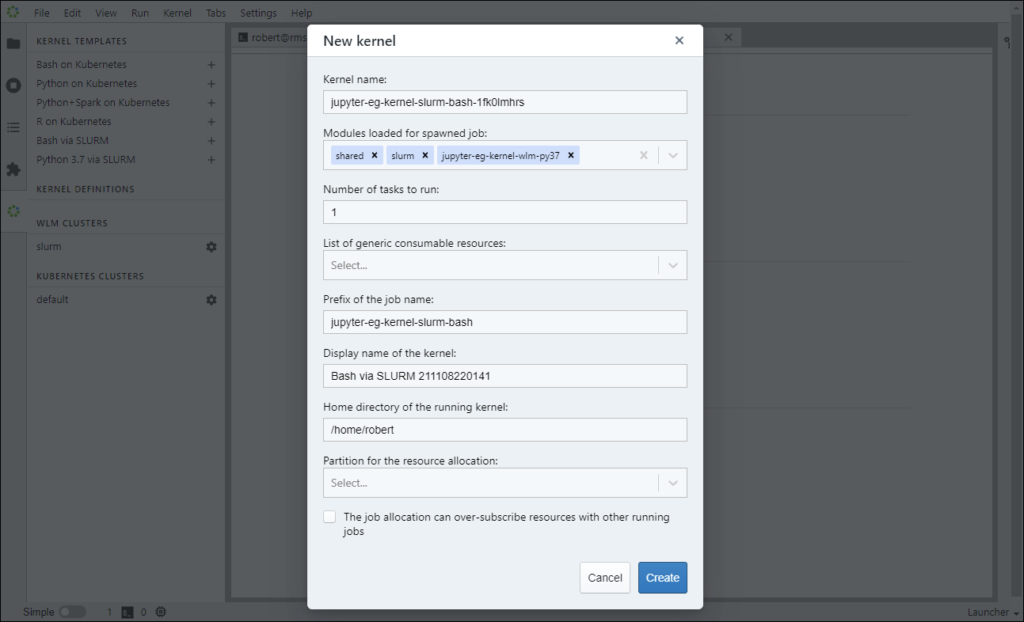
-
- And this is what the template looks like after we’ve configured it:
- NOTE: We’ve added a generic resource, changed the display name, and selected the Slurm partition to which we want the kernel submitted.
- And this is what the template looks like after we’ve configured it:
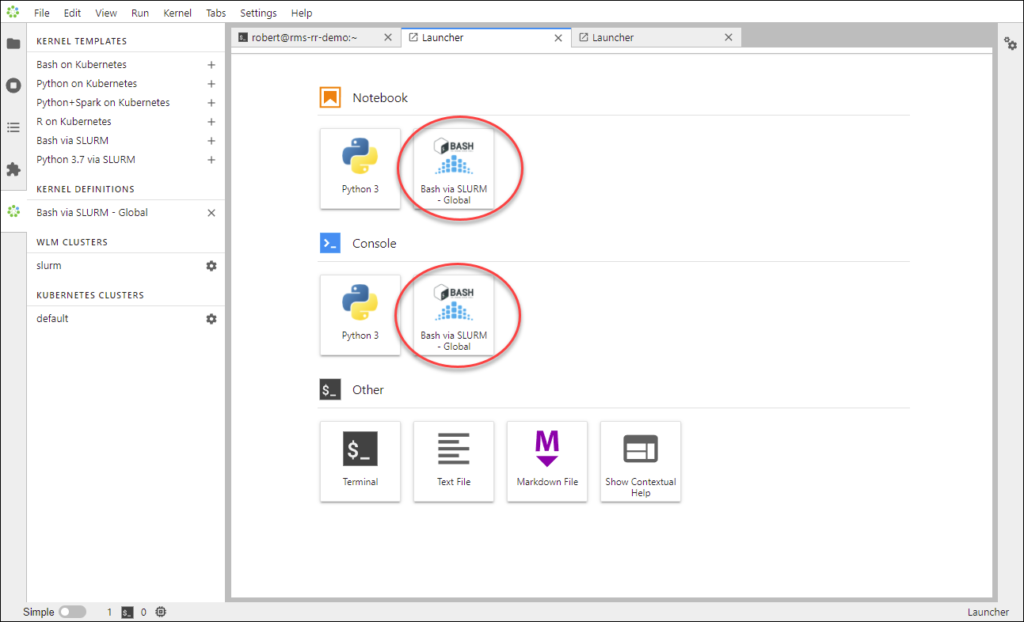
- Now the kernel appears in the launcher, but only for the user
robert:
5. Make the kernel available for use in every user’s launcher:
- The kernel has been customized and written to
$HOME/.local/share/jupyter/kernels, which is one of the directories Jupyter searches for kernel definitions:
# ls -l /home/robert/.local/share/jupyter/kernels/
total 0
drwxr-xr-x 2 robert robert 47 Nov 8 22:10 jupyter-eg-kernel-slurm-bash-1fk0lmhrs
- Now we will move it to
/cm/shared/apps/jupyter/current/share/jupyter.- This is a shared directory, which is available to all cluster users:
# mv /home/robert/.local/share/jupyter/kernels/jupyter-eg-kernel-slurm-bash-1fk0lmhrs \
/cm/shared/apps/jupyter/current/share/jupyter/kernels
- Next, we must edit the kernel definition
kernel.jsonto work for all users.- We only need to comment out (or remove) the line
"#SBATCH --chdir=/home/robert",. Since Slurm sets the working directory to the user’s home directory by default, this line is not needed:
- We only need to comment out (or remove) the line
# vim /cm/shared/apps/jupyter/12.1.0/share/jupyter/kernels/jupyter-eg-kernel-slurm-bash-1fk0lmhrs/kernel.json-
- Here’s what the kernel definition looks like after commenting that line.
{
"display_name": "Bash via SLURM - Global",
"language": "bash",
"metadata": {
"process_proxy": {
"class_name":"cm_jupyter_kernel_creator.eg_processproxies.slurm.SlurmProxy",
"config": {
"environ": [
"source /etc/profile.d/modules.sh",
"module load shared slurm jupyter-eg-kernel-wlm-py37"
],"submit": [
"sbatch --parsable"
],
"query": [
"squeue -h -j {job_id} -o \"%T %B\""
],
"cancel": [
"scancel {job_id}"
],
"submit_script": [
"#!/bin/bash",
"#SBATCH -n 1",
"",
"#SBATCH --export=NONE",
"#SBATCH --gres=gpu:t4:1",
"#SBATCH --job-name=jupyter-eg-kernel-slurm-bash-{kernel_id}",
"##SBATCH --chdir=/home/robert",
"#SBATCH --partition=jup",
"set -xe",
"{environ}",
"{kernel_cmd}"
]
}}
},
"argv": [
"ipykernel-wlm",
"--RemoteProcessProxy.kernel-id",
"{kernel_id}",
"--RemoteProcessProxy.response-address",
"{response_address}",
"--RemoteProcessProxy.port-range",
"{port_range}",
"--RemoteProcessProxy.shutdown-timeout",
"600",
"--RemoteProcessProxy.kernel-lang",
"bash"
]
}
6. Test to ensure the procedure worked as expected.
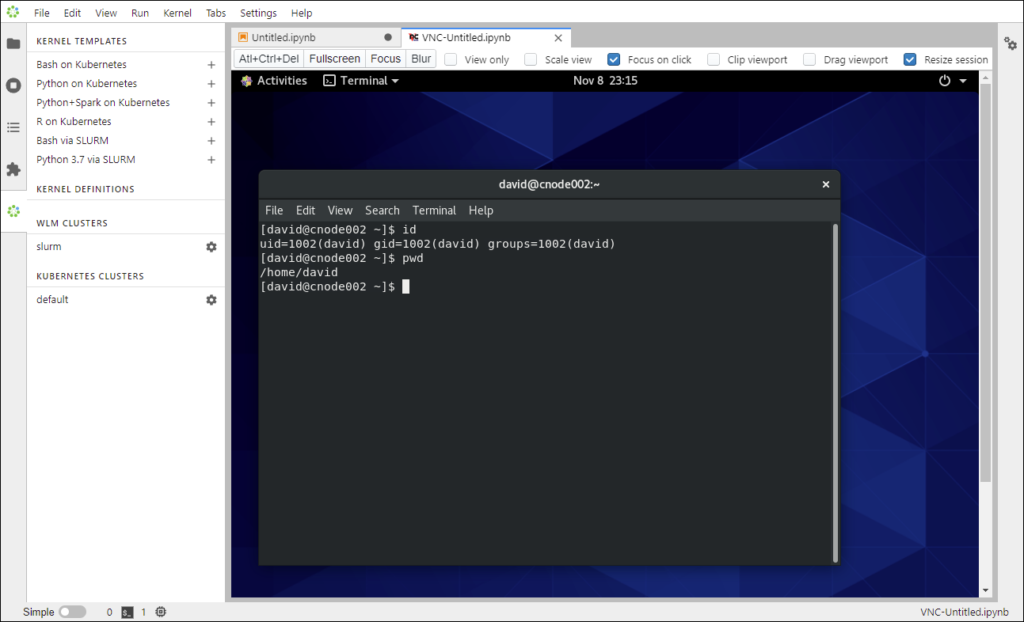
- To verify that this worked, we’ve logged out of Jupyter and logged back in as the user
david. - As you can see, David’s launcher also has the “Bash via SLURM – Global” kernel, as do all of the Jupyter users..

- Now that we know the notebook is displayed, we must verify that it works.
- We can do so by clicking on the “Bash via SLURM – Global” icon.
- Behind the scenes, a job is submitted to Slurm as the user
david. - Slurm dispatches the job to an available compute node.
- David’s browser is automatically redirected to the execution node.
- Behind the scenes, a job is submitted to Slurm as the user
- If everything is working correctly, you will see the notebook running.
- Here you can see David’s notebook running on cnode002.